> ## Documentation Index
> Fetch the complete documentation index at: https://docs.preprod.world/llms.txt
> Use this file to discover all available pages before exploring further.
# Add an origin group to a CDN resource
Origin groups define the content sources for a CDN resource and support load balancing and failover across multiple origins.
## Origin group overview
One origin group can contain a single website, private bucket, or FastEdge HTTP application, or multiple origins.
With multiple active origins, the CDN distributes requests using a round-robin algorithm. Backup origins handle requests when an active origin returns a 5xx error, which increases fault tolerance.
## Step 1. Add a new origin group
Create an origin group during [resource creation](/cdn/getting-started/create-a-cdn-resource/create-a-cdn-resource#step-1-start-creation), from an existing resource, or on the **Origin groups** page.
### In resource settings
Add a group while configuring an existing CDN resource.
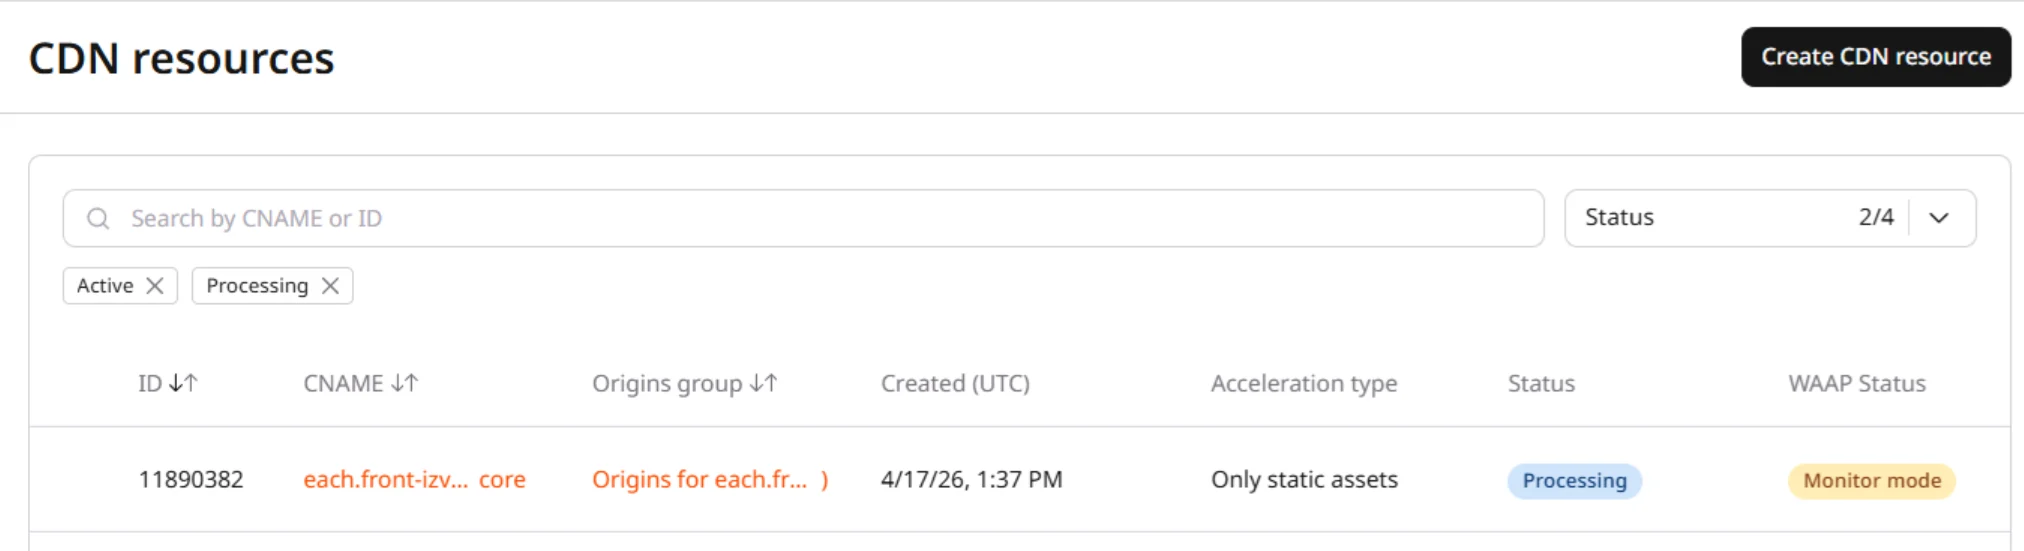
In the [Gcore Customer Portal](https://portal.gcore.com/cdn/resources/list), navigate to **CDN**, find the resource, and click its **CNAME**.
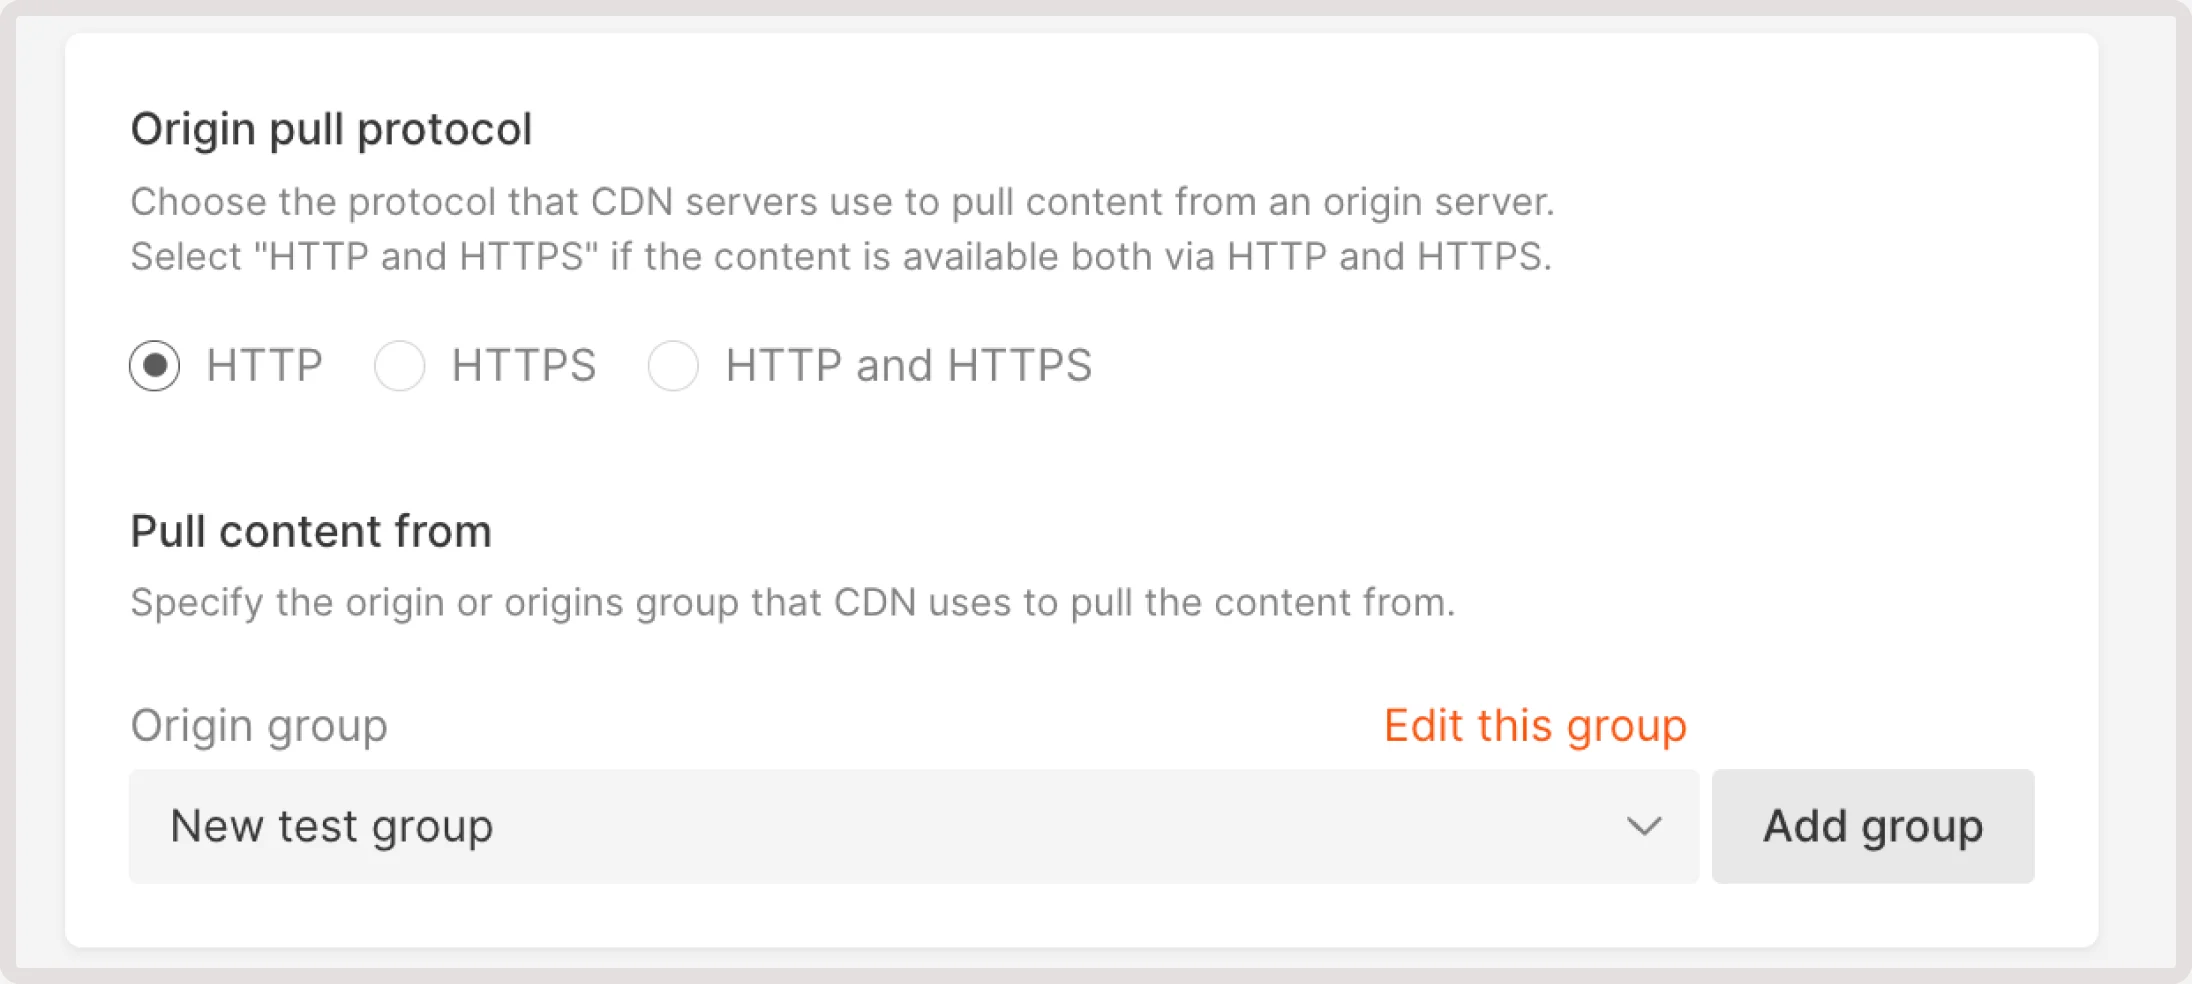
 In the **Origin pull protocol** section, click **Add group**.
 ### On the origin groups page
Groups created on the **Origin groups** page must be attached to a CDN resource after creation.
In the Customer Portal, navigate to **CDN** > **Origin groups**.
### On the origin groups page
Groups created on the **Origin groups** page must be attached to a CDN resource after creation.
In the Customer Portal, navigate to **CDN** > **Origin groups**.
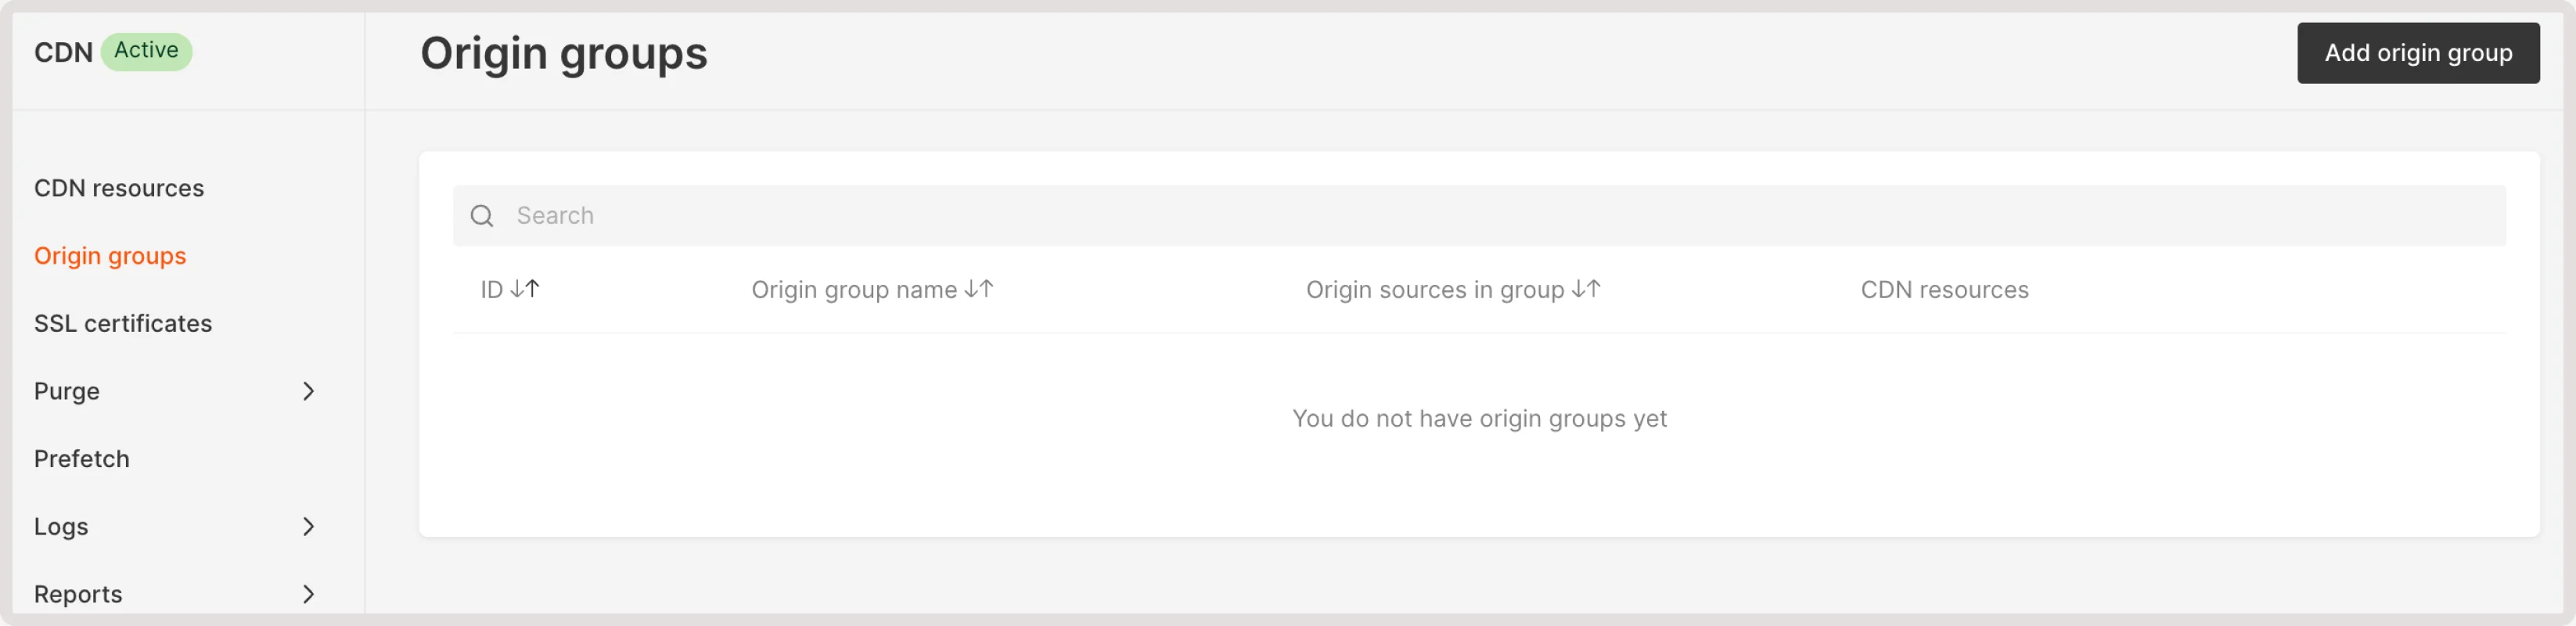 Click **Add origin group**.
## Step 2. Enter the origin group name
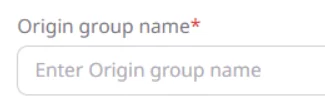
Enter a unique **Origin group name**.
Click **Add origin group**.
## Step 2. Enter the origin group name
Enter a unique **Origin group name**.
 ## Step 3. Configure the origin group
Add one or more origins to the group. For URL and S3 origins, **Host header override** is optional; when left empty, the CDN uses the **Host header** value from the CDN resource settings.
### S3 storage
Select **Amazon** for Amazon S3 or **Other** for another S3-compatible storage service.
Without Origin Shielding, each cache miss on a CDN node sends a request directly to the S3 bucket. At scale, this can overload the storage cluster — enable [Origin Shielding](/cdn/cdn-resource-options/general/enable-and-configure-origin-shielding) to route cache misses through a single shielding node and reduce S3 load.
#### Amazon S3 storage
Amazon S3 requires an access key ID and secret access key; the [AWS guide](https://docs.aws.amazon.com/powershell/latest/userguide/pstools-appendix-sign-up.html) explains where to find both values.
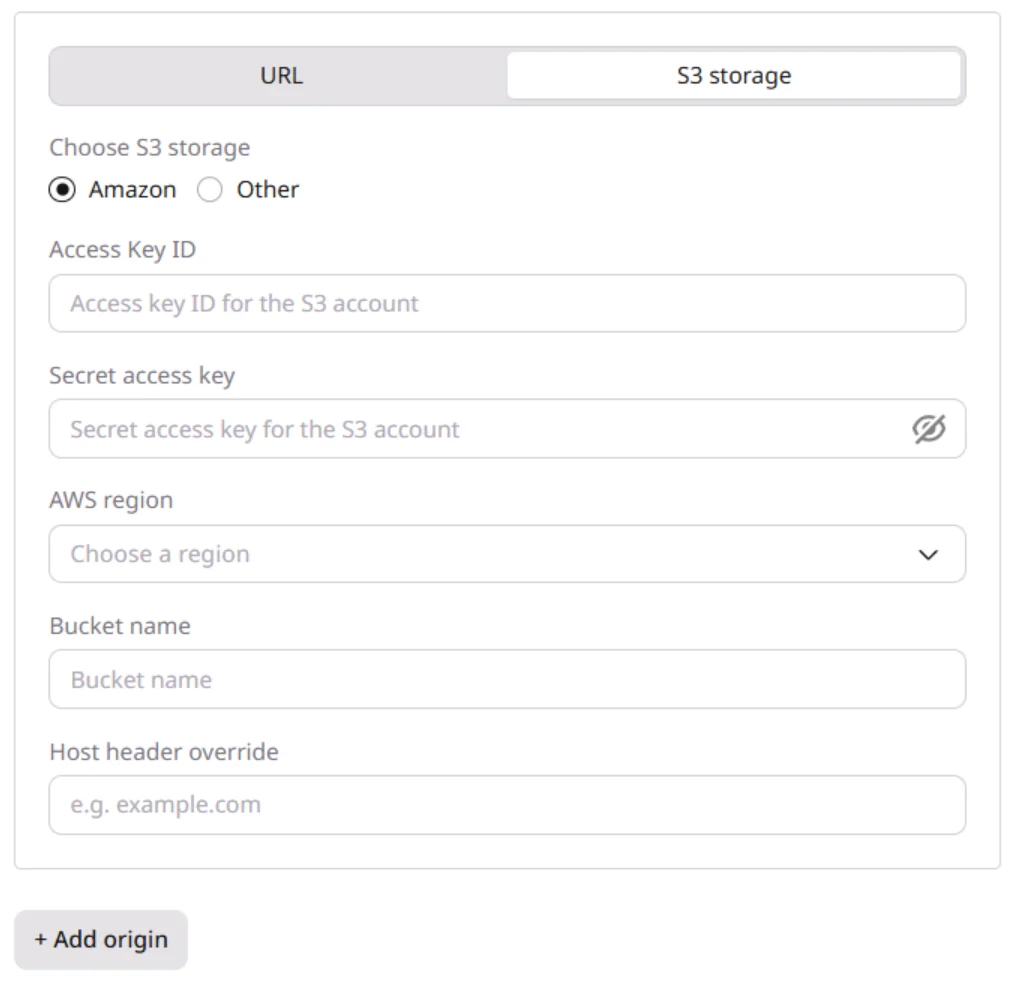
Select **S3 storage**, then select **Amazon**.
Enter the storage details:
1. Enter the **Access Key ID**.
2. Enter the **Secret access key**.
3. Select the **AWS region** where the bucket is hosted.
4. Enter the **Bucket name**.
5. (Optional) Enter the **Host header override**.
## Step 3. Configure the origin group
Add one or more origins to the group. For URL and S3 origins, **Host header override** is optional; when left empty, the CDN uses the **Host header** value from the CDN resource settings.
### S3 storage
Select **Amazon** for Amazon S3 or **Other** for another S3-compatible storage service.
Without Origin Shielding, each cache miss on a CDN node sends a request directly to the S3 bucket. At scale, this can overload the storage cluster — enable [Origin Shielding](/cdn/cdn-resource-options/general/enable-and-configure-origin-shielding) to route cache misses through a single shielding node and reduce S3 load.
#### Amazon S3 storage
Amazon S3 requires an access key ID and secret access key; the [AWS guide](https://docs.aws.amazon.com/powershell/latest/userguide/pstools-appendix-sign-up.html) explains where to find both values.
Select **S3 storage**, then select **Amazon**.
Enter the storage details:
1. Enter the **Access Key ID**.
2. Enter the **Secret access key**.
3. Select the **AWS region** where the bucket is hosted.
4. Enter the **Bucket name**.
5. (Optional) Enter the **Host header override**.
 #### Other S3 storage
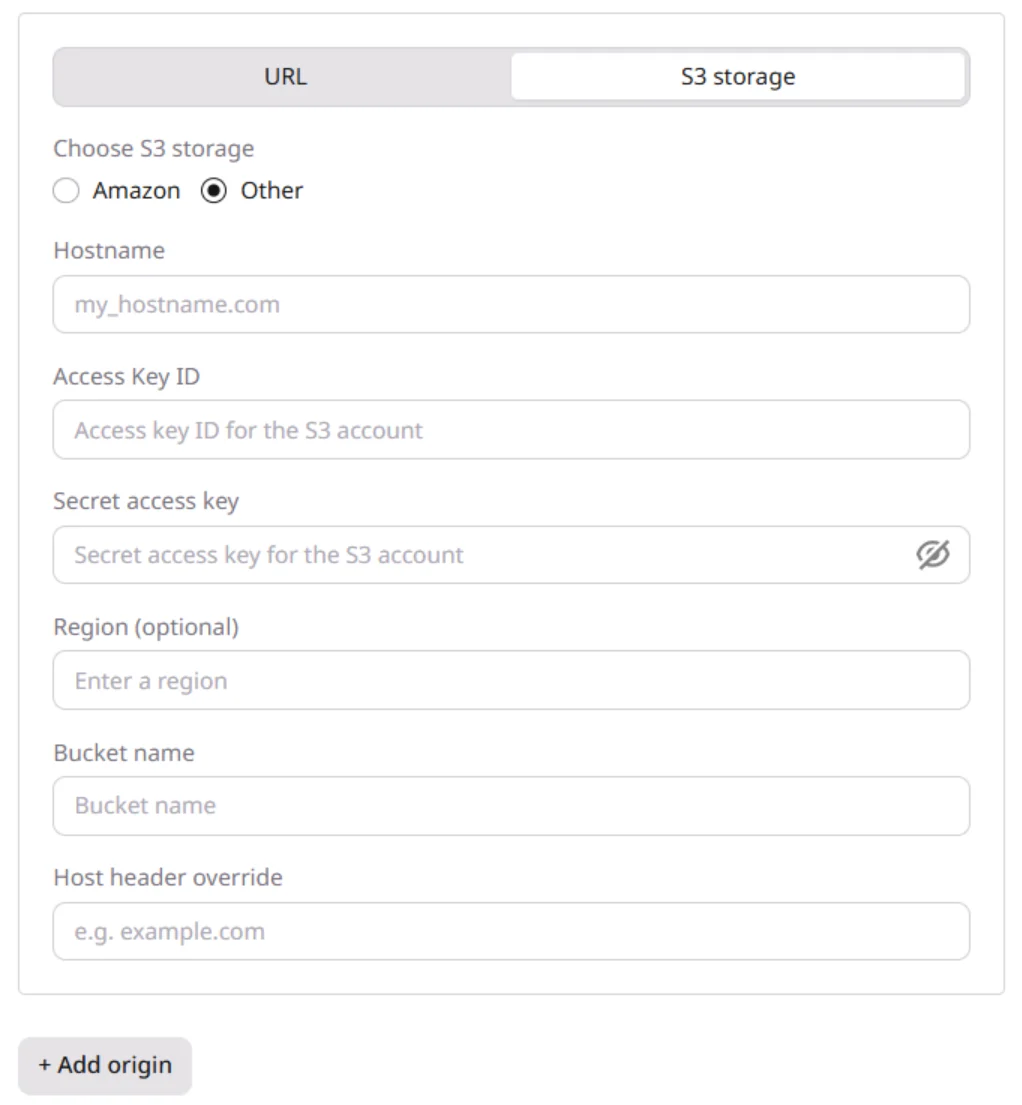
Other S3-compatible services require the storage hostname, credentials, region, and bucket name.
Select **S3 storage**, then select **Other**.
Enter the storage details:
1. Enter the storage server **Hostname**.
2. Enter the **Access Key ID**.
3. Enter the **Secret access key**.
4. Enter the **Region** where the bucket is hosted.
5. Enter the **Bucket name**.
6. (Optional) Enter the **Host header override**.
#### Other S3 storage
Other S3-compatible services require the storage hostname, credentials, region, and bucket name.
Select **S3 storage**, then select **Other**.
Enter the storage details:
1. Enter the storage server **Hostname**.
2. Enter the **Access Key ID**.
3. Enter the **Secret access key**.
4. Enter the **Region** where the bucket is hosted.
5. Enter the **Bucket name**.
6. (Optional) Enter the **Host header override**.
 ### URL origin
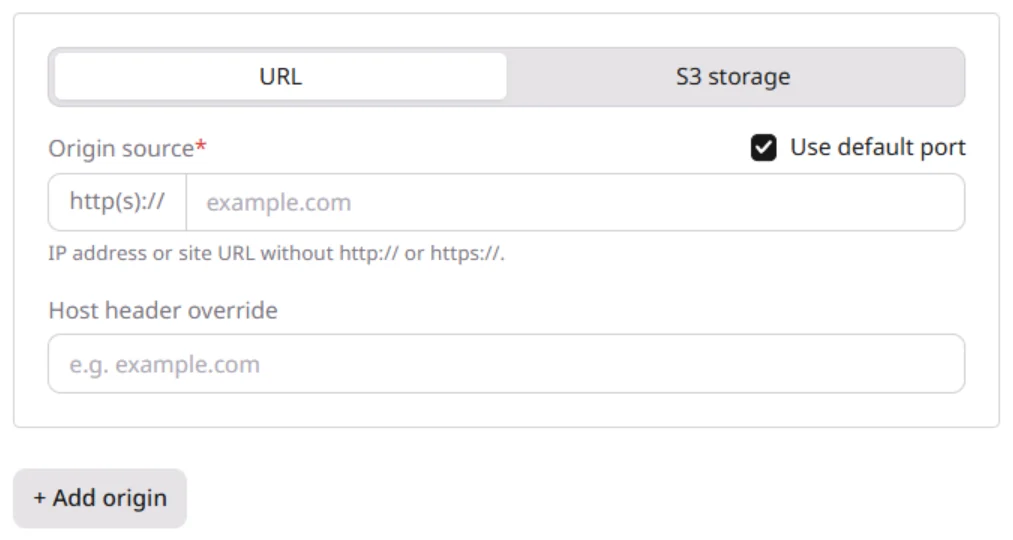
Use a URL origin for a website or IP address that doesn't require S3 authentication.
Select **URL**.
Enter the origin details:
1. In **Origin source**, enter the IP address or domain name without `http://` or `https://`.
2. (Optional) Enter the **Host header override**.
3. (Optional) For ports other than 80 or 443, disable **Use default port** and enter the port.
### URL origin
Use a URL origin for a website or IP address that doesn't require S3 authentication.
Select **URL**.
Enter the origin details:
1. In **Origin source**, enter the IP address or domain name without `http://` or `https://`.
2. (Optional) Enter the **Host header override**.
3. (Optional) For ports other than 80 or 443, disable **Use default port** and enter the port.
 (Optional) Click **+ Add origin** and enter another source. The CDN distributes requests across active origins using a round-robin algorithm.
### FastEdge HTTP application
A FastEdge HTTP application can serve as a native CDN origin. Requests reach the application directly on the same edge node, which avoids duplicate response headers, preserves client GeoIP data, and reduces latency.
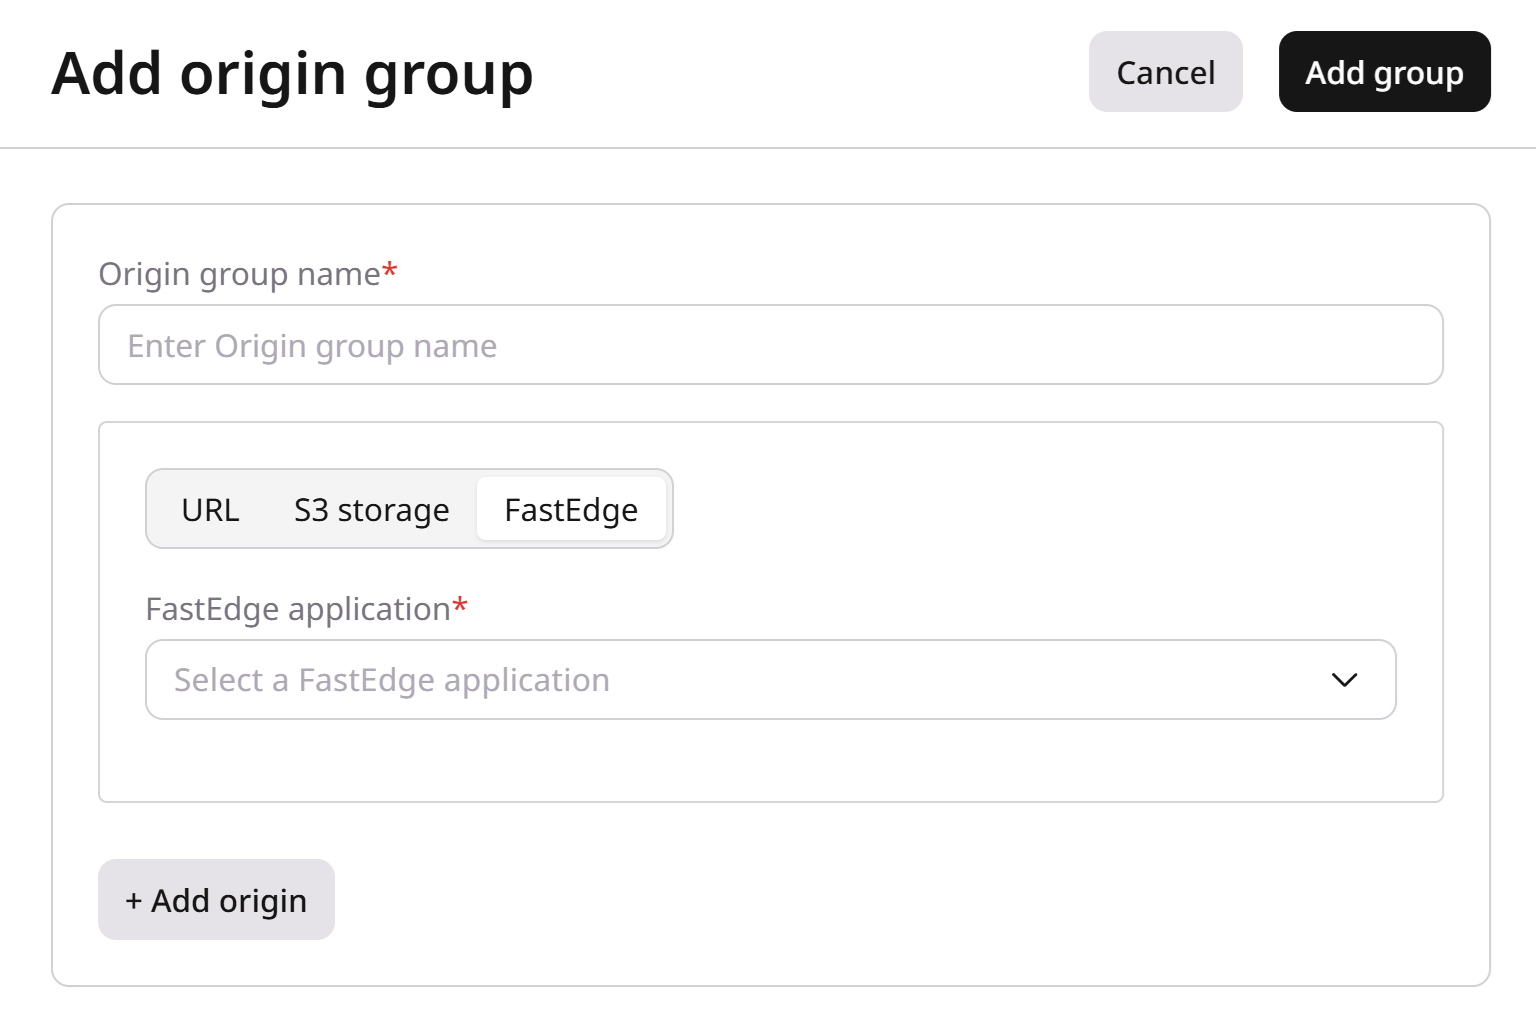
Select **FastEdge**.
In the **FastEdge application** dropdown, select the HTTP application.
(Optional) Click **+ Add origin** and enter another source. The CDN distributes requests across active origins using a round-robin algorithm.
### FastEdge HTTP application
A FastEdge HTTP application can serve as a native CDN origin. Requests reach the application directly on the same edge node, which avoids duplicate response headers, preserves client GeoIP data, and reduces latency.
Select **FastEdge**.
In the **FastEdge application** dropdown, select the HTTP application.
 ### Available options
#### Set up multiple origins
For groups with multiple origins, configure their availability, roles, and failover behavior:
* Enable or disable each origin.
* Assign active and backup origins.
* Enable or disable **Use next upstream**.
### Available options
#### Set up multiple origins
For groups with multiple origins, configure their availability, roles, and failover behavior:
* Enable or disable each origin.
* Assign active and backup origins.
* Enable or disable **Use next upstream**.
 #### Enable or disable an origin
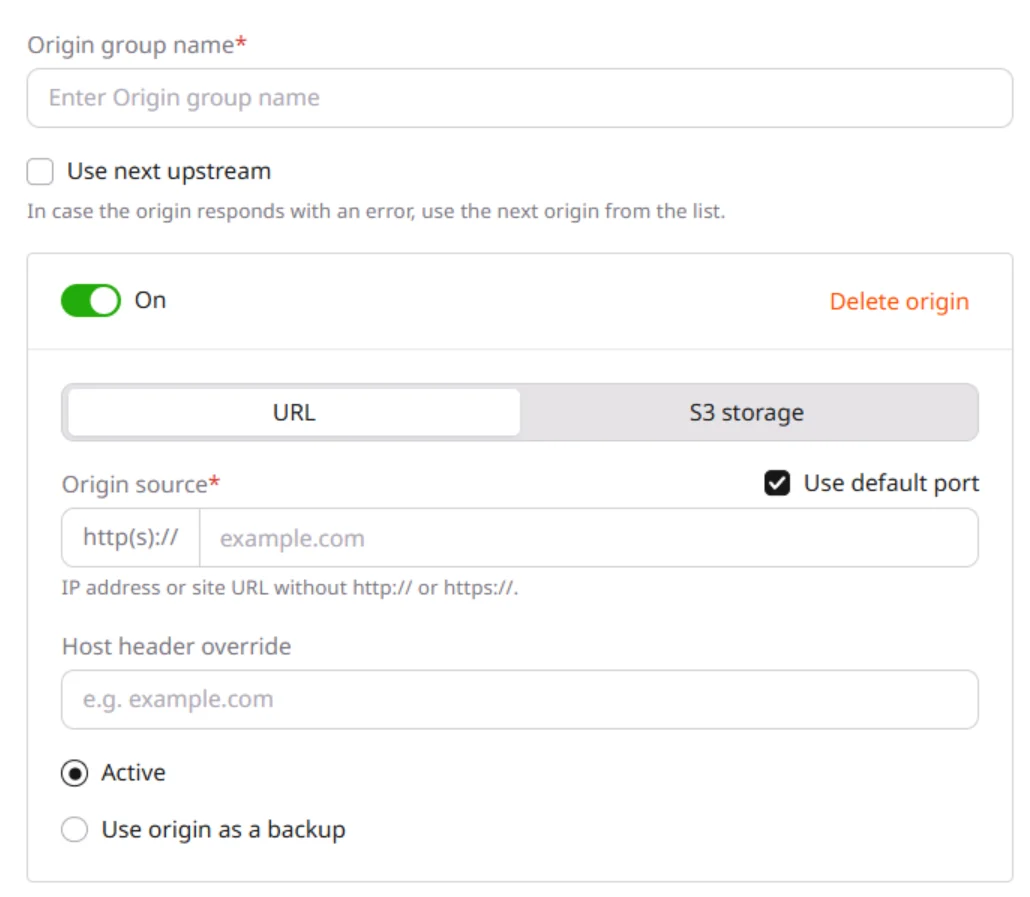
Each origin has the **On** toggle enabled by default, so the CDN can pull content from it. Disable the toggle to remove the origin from this group's load balancing; requests stop reaching it within 15 minutes.
At least one active origin must remain enabled.
#### Activate origin or use it as backup
New origins receive the **Active** status by default and participate in round-robin load balancing. Select **Use origin as a backup** to remove an origin from regular balancing and use it when an active origin returns a 5xx error.
#### Use next upstream
Enable **Use next upstream** only when every origin contains the same content. The CDN then tries subsequent origins after eligible 4xx or 5xx responses, except code 400; if no origin succeeds, it returns the final origin's response.
The resulting request behavior depends on the origin roles and option state:
| Case | CDN request behavior |
| -------------------------------------------------------------------------------- | -------------------------------------------------------------------------------------------------------------------------- |
| **Use next upstream** is disabled; all origins are active | The CDN returns an active origin's error response to the client |
| **Use next upstream** is enabled; one origin is active and the rest are backups | After a 4xx or 5xx response, the CDN tries the remaining origins in list order |
| **Use next upstream** is enabled; all origins are active | After a 404, 500, 502, 503, or 504 response, the CDN tries the remaining origins in list order |
| **Use next upstream** is disabled; one origin is active and the rest are backups | After a 5 s timeout or 5xx response, the CDN tries a backup origin. For a 4xx response, it returns the error to the client |
## Step 4. Save changes
Click **Add group**.
## Step 5. Attach the origin group
Changing a resource's origin group doesn't update its Host header. Update the [Host header](/cdn/cdn-resource-options/http-headers/configure-and-check-the-host-header#how-to-manage-the-host-header) separately.
Attach a group created from the **Origin groups** page to its CDN resource.
In the Customer Portal, navigate to **CDN**, find the resource, and click its **CNAME**.
In the **Origin** section, select the group from the **Origin group** dropdown and click **Add group**.
Click **Save changes**.
#### Enable or disable an origin
Each origin has the **On** toggle enabled by default, so the CDN can pull content from it. Disable the toggle to remove the origin from this group's load balancing; requests stop reaching it within 15 minutes.
At least one active origin must remain enabled.
#### Activate origin or use it as backup
New origins receive the **Active** status by default and participate in round-robin load balancing. Select **Use origin as a backup** to remove an origin from regular balancing and use it when an active origin returns a 5xx error.
#### Use next upstream
Enable **Use next upstream** only when every origin contains the same content. The CDN then tries subsequent origins after eligible 4xx or 5xx responses, except code 400; if no origin succeeds, it returns the final origin's response.
The resulting request behavior depends on the origin roles and option state:
| Case | CDN request behavior |
| -------------------------------------------------------------------------------- | -------------------------------------------------------------------------------------------------------------------------- |
| **Use next upstream** is disabled; all origins are active | The CDN returns an active origin's error response to the client |
| **Use next upstream** is enabled; one origin is active and the rest are backups | After a 4xx or 5xx response, the CDN tries the remaining origins in list order |
| **Use next upstream** is enabled; all origins are active | After a 404, 500, 502, 503, or 504 response, the CDN tries the remaining origins in list order |
| **Use next upstream** is disabled; one origin is active and the rest are backups | After a 5 s timeout or 5xx response, the CDN tries a backup origin. For a 4xx response, it returns the error to the client |
## Step 4. Save changes
Click **Add group**.
## Step 5. Attach the origin group
Changing a resource's origin group doesn't update its Host header. Update the [Host header](/cdn/cdn-resource-options/http-headers/configure-and-check-the-host-header#how-to-manage-the-host-header) separately.
Attach a group created from the **Origin groups** page to its CDN resource.
In the Customer Portal, navigate to **CDN**, find the resource, and click its **CNAME**.
In the **Origin** section, select the group from the **Origin group** dropdown and click **Add group**.
Click **Save changes**.